Why Every Horse Owner Should Know How to Standing Wrap
Standing wraps – some people love them and some people love to hate them. Whether you’ve never wrapped an equine leg or you’re practically a professional wrapper, the fact is that at some point in your life with horses you will have to wrap.
I can hear the groans already – “My horse doesn’t work hard enough to warrant being wrapped”, “I don’t need to know how to wrap because I have quick wraps”, or even “I don’t know how to wrap and wrapping incorrectly can do harm to the leg”. While any of those statements might be true at any given time, at some point every horse gets hurt (think about it – how many times in your life have you needed an ace bandage? My guess is at least once 😉 ). Why wait until your horse is hurt to learn? Perfecting wrapping can take some practice, so learning before it’s emergency will make the process much less stressful.
With horses, most injuries to the legs cause some sort of swelling and compression can be a useful treatment. While it’s true that wrapping a leg incorrectly can do harm to the leg, the technique is simple and easy to master with enough practice.
IMPORTANT THINGS TO REMEMBER WHEN WRAPPING
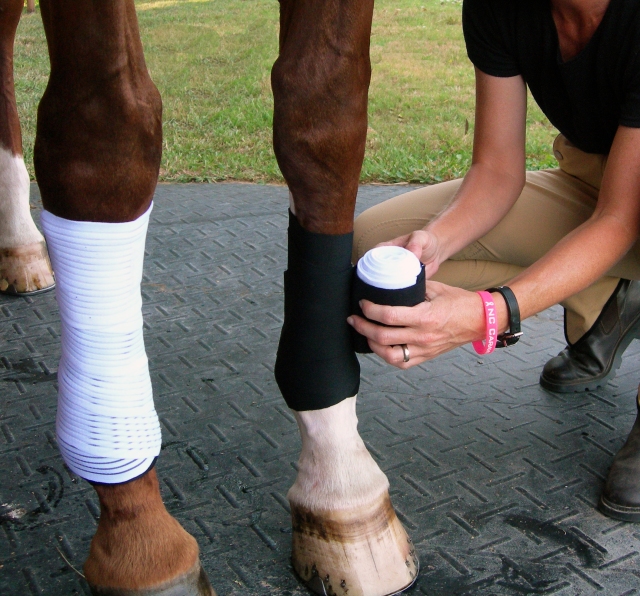
1. Start under the knee with the quilted wrap. Wrap from the inside of your horse’s leg to the outside, and from front to back.
2. Once you have the quilted wrap around the leg, don’t let go! Start the elastic bandage in the middle, wrap down first, and then back up and finish at the top.
3. Be sure to overlap the elastic generously to ensure that the bandage stays in place (Most pro wrappers say cover 50% per lap.)
4. Pull tight across the front, just be firm around the back.
5. DO NOT apply extra pressure as you go around the tendon in the back
6. Make sure your pillow wraps and outer standing wraps are smooth and unwrinkled
7. If you need to include the fetlock for tendon support, make sure to include it in your wrap
8. Do not leave on for longer than 24 hours without removing and re-wrapping (Some experts recommend not leaving on for longer than 12 hours without re-wrapping.)
9. Practice, practice, practice!
(Taken from “Horse & Man: Standing Wraps. Why you should know how to wrap a Standing Wrap BEFORE you need them…“)
For all the visual learners out there (myself included), there’s some great video tutorials out there.
Equestrian Life: How to Place a Standing Wrap
How To Apply Polo Wraps & Standing Bandages (HorseGirlTV® Classics)
The Horse Lover’s 2 Minute How to Apply Standing Wraps

Keep in mind that there are a few different variations on applying standing wraps (some people like to start in the middle of the leg instead of the top, some roll their elastic bandage into the pillow wrap, and some folks wrap higher/lower on the leg than others). While techniques may vary slightly, the basics are the same for every standing wrap:
1. Wrapping front to back, outside to inside.
2. Even tension and pulling the wrap tight across the front of the leg.
3. Wrapping clean, dry legs.
4. Leaving wraps on no longer than 12 hours unless instructed by your veterinarian.
Remember, if you’re wrapping for the first time and are nervous, ask a knowledgeable friend or other equine professional for help!
~Becky


Leave a Reply